UD4-76 flaw detector – ultrasonic laboratory within dimensions of manual flaw detector
Analyzing the trends of NDT equipment development and our customers' comments, "PROMPRYLAD" LLC specialists concluded that it is necessary to design a new ultrasonic flaw detector with extended functionality. Tomograph functions – B-scans read-out with scanning path timing, construction and operation with orthogonal views of B-scans – became main add-ons. These options allow an operator to get the information on dimensions and distribution of defects in the testing object in real time. So, there will be no need to calculate mentally and draw defectograms any more. Mutual bracing of detected flaws will be visually displayed on the orthogonal views of B-scan. Execution of measurements by radio-frequency B-scans will make it possible to get the information not only about conditional, but also about actual (in case of TOFD techniques applying) dimensions of defects. Flaw detector provides convenient corrosion mapping, too. The tools for operation with signal spectrum and many other functions have been added as well.
Plenty of functions may create an impression that flaw detector is difficult to master. However, that's not true. Design engineers have taken a set of measures simplifying flaw detector operation. Firstly, this is a considered structure of tree-coded menus where all setups of the instrument are grouped in intuitive order. Moreover, there are two menu modes – "User" and "Expert". In the first mode only basic setups of the instrument are presented in the menu, in the second mode – the entire spectrum of functions of flaw detector-tomograph is available.
For the reader's convenience the description of instrument capacities is made in the following way: at the beginning there is a list of functions and technical specifications of flaw detector, and then, the most interesting ones of them are described in detail.
| Pass band of reception path, MHz | 0,2 ÷ 20 |
| Rated values of central frequencies of bandpass filter, MHz | 0,4; 1,25; 1,8; 2,5; 5; 10; 15 |
| Rated values of initial pulse repetition frequencies, Hz / setup resolution, Hz | 30 ÷ 1000 / 1; 10; 100 |
| Amplitude of initial pulse of pulser in the mode of max. amplitude / in the mode of min. amplitude, V | no less than 200 / 20 |
| Range of reception path gain control, dB / setup resolution, dB | 0 ÷ 100 / 0,1; 0,5; 1; 10 |
| Dynamic range of signals observed on the screen, dB | no less than 20 |
| Range of testing for defects presence in steel, mm / setup resolution, mm | 1 ÷ 10 000 / 1; 10; 100 |
| Range of defects depth measurements in steel, mm | 0,5 ÷ 10 000 |
| Range of equivalent flaw diameter measurements, mm | 0,8 ÷ 20 |
| Range of sound velocity setup, m/s / setup resolution, m/s | 1 000 ÷ 15 000 / 1; 10; 100; 1000 |
| Range of probe angle setup / setup resolution | from 0 to 90 / 0,1; 1,0; 10,0 |
| Range of scan delay setup relative to excitation pulse, mm / setup resolution, mm | from 0 to 10 000 / 1; 10; 100; 1000 |
| Range of setup of measuring gate delay duration, mm / setup resolution, mm | from 1 to 10 000 / 1; 10; 100; 1000 |
| Range of ALARM threshold setup (height of measuring gate levels): | |
| - acceptance level (red level of gate), dB / setup resolution, dB | minus 34 … + 6 dB / 0,1; 1 10 |
| - registration level (blue level of gate) , dB / setup resolution, dB | minus 34 … + 6 dB, / 0,1; 1; 10 |
| - search level (green level of gate) , dB / setup resolution, dB; | minus 34 … + 6 dB, / 0,1; 1; 10 |
| Range of linear compensated cutoff setup / setup resolution | from 0 to 80 % of screen height / 1 %. |
| Number of stored flaw detector setups | no less than 100 |
| Number of stored scan views (А-Scan views) | no less than 100 |
| Number of stored measured depth (coordinates) values | no less than 150 000 |
| Number of stored B-Scan views | is limited by embedded memory card capacity |
| Weight of flaw detector with storage battery (without probes set, wires and case), kg | no more than 3,5 |
| Flaw detector power supply | built-in storage battery 12 V |
| AC mains 220V, 50 Hz | |
| Capacity of built-in storage battery | 4500 mА/hour |
Functional capabilities of flaw detector
- operation with any type of probes.
- measurement of equivalent and conditional dimensions of defects;
- "thickness gauge" function;
- scans, such as A-scan, B-scan;
- timing: internal, external, from encoder;
- scanning velocity testing;
- various forms of flaw detection: RF/ full wave/ +half wave / – half wave;
- gain control function set, including: AGC, TCG;
- interface of automatic calibration of probe and testing object parameters;
- several operation modes with DGS diagrams;
- two independent three-level measuring gates;
- two additional special gates;
- acoustic coupling testing option;
- ALARM system by all gate levels;
- ALARM indication on bright three-color LEDs;
- improved mode of peak curve;
- mode of current signal overlaying of the signal registered before ("still frame" mode);
- signal spectrum construction;
- dynamic measurement of initial pulse width characteristics depending on the switched on frequency filters;
- screen layout by signal reflections in the testing object;
- special program interface usage option;
- possibility of menu structure selection by two schemes: "User" / "Expert";
- possibility of audio comment creation for all types of stored data;
- large high-contrast TFT display;
- testing setups storing and activation;
- connection with PC via USB port.
Large contrast color display of high resolution in combination with considered color schemes allow an operator to perceive simultaneously a great number of information without being tired. Working space of display is conditionally divided in 3 main parts: working area of scan, flaw detector menu area and information panel. If desired, an operator can switch over to the full-screen operating mode; in this mode the scan area occupies the whole display area (Fig. 1).
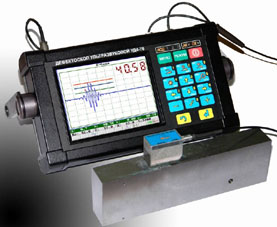
Fig. 1. Appearance of UD4-76 electronic unit.
Flaw detector operation is carried out by means of tree-coded menus which have already become usual for all computer users. For operator's convenience the setups parameters are grouped in submenus in conformity with the instrument logic. For example, delay in the wedge, refracted angle and switch which are the probe characteristics are set up in "Probe" menu, and sound velocity and item thickness are situated in "Testing object" menu.
Under the conditions of constant development and upgrading of hardware and software components of modern flaw detectors, their functionality increases, and therefore, the instrument operation complexity as well. Complex architecture of working menu of flaw detector often doesn't enable to change the running setups on-the-fly – this problem is solved in the latest software version of UD4-76 flaw detector which provides the menu structure selection depending on the complexity of performed instrument setups. There are two types of menu structure in flaw detector – "User" and "Expert" (Fig. 2).
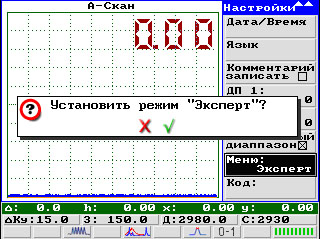
Fig. 2. User / Expert modes change
The most important parameters of flaw detector and measurement results (up to 5 defect parameters) are constantly displayed on the information panel. It is also possible to display the most informative, from the user's pint of view, measured parameter of defect in working scan area what considerably simplifies the user's operation (Fig. 3).
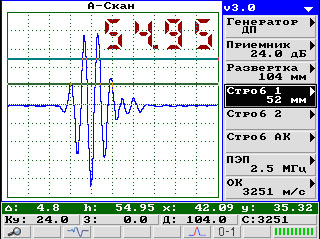
Fig. 3. Measurement results on the flaw detector screen
For more detailed viewing of displayed image two independent modes are used in the instrument: "electronic magnifying glass" mode and full-screen mode (Fig. 4).
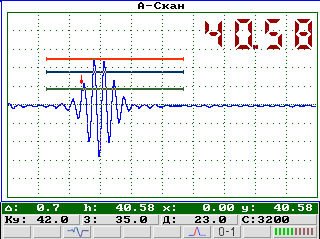
Fig. 4. Full-screen mode of flaw detector display
Alongside with simple and usual modes of setup and operation, new "express-modes" are also offered in UD4-76 flaw detector-tomograph. They are aimed at the measurement accuracy increase and time reduction when preparing the instrument for testing. One of them is the mode of semiautomatic calibration of probe and testing object parameters (Fig. 5). The present mode enables to simplify maximum the process of flaw detector presetup when connecting a new probe or calibrating a used probe.
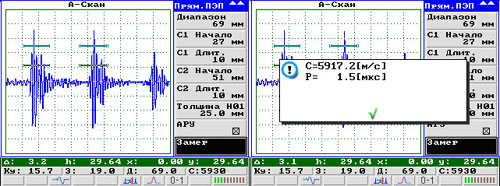
Fig. 5. Semiautomatic calibration of probe parameters
For example, for semiautomatic calibration of straight beam probes on a random block it is sufficient to set the block thickness and, having gated the first and the second bottom echo signals by special measuring gates, initialize the measurement. The measured values of sound velocity in the block and the value of delay in the probe wedge are the measurement results (Fig. 5). The parameters received later can be stored as the current ones, or remeasure them.
For angle beam probes the selection is considerably richer:
- It is possible to calibrate delay in the wedge on SО-3,
- refracted angle – on SО-2,
- а скорость – по любому отражателю в объекте контроля – например по сигналу от торца.
- velocity – by any reflector in the testing object – for instance, by the signal from the end.On the other part, it is possible to do without calibration blocks at all, having calibrated all 3 values by two reflections from the testing object end – by the straight and reflected beams.
- And finally, it is possible to calibrate delay in the wedge and velocity in the testing object by any two reflectors in the testing object, for example, by its design features.
It is possible to calibrate the straight beam probes, angle beam probes and probes of surface wave in the instrument.
Special attention has been paid to the improvement of acoustic duct of flaw detector. Connection of both selective narrow-band filters corresponding to operating frequencies of connected probes, and wide-band filter with passband of 0.2 – 20 MHz are also provided. Moreover, algorithms of dynamic change of generating duct characteristics depending on the switched on frequency filter are used in the instrument. And eventually, in addition to ordinary filtering there was used an innovation technique of spectral-time signal processing what allowed to increase considerably the signal/noise ratio during testing (Fig.6).
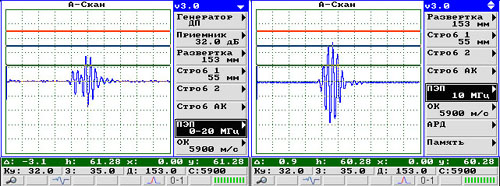
Fig. 6. Echo signal view on flaw detector display: a) at the switched off algorithm of dynamic change of generating duct characteristics; b) at the switched on algorithm
It is well-known that for correct computation of DGS-diagrams it is essential to set precisely the used probe frequency. Taking into consideration that every probe has its own individual operating frequency, for performing correct measurements in UD4-76 there is a built-in spectrograph with possibility of precise measurement of probe operating frequency and signal range display on flaw detector screen (Fig. 7).
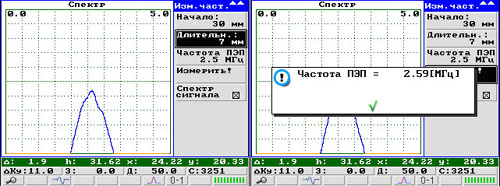
Fig. 7. Signal range display and probe frequency measurement
To transfer "B-scans", "A-scans" and "Files" to PC for creation of reports on the basis of testing results or databases, there is a built-in USB port in flaw detector. If required, it is possible for the user to input setups for certain testing types in flaw detector from PC what significantly reduces the time of flaw detector preparation for inspection carrying out (Fig. 8).
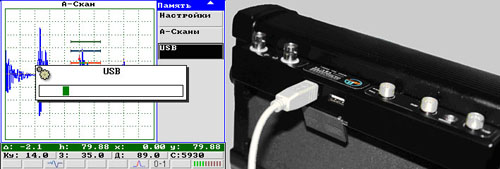
Fig. 8. Mode of UD4-76 connection to PC
Special program interface usage is also provided in flaw detector. The interface is applied when solving special UST tasks. While inspecting various duplicate parts or when the parts have a lot of testing areas, there is a need to create many different setups of flaw detector. To call these setups, one should remember where they are, and before starting operating it is necessary to recheck them or reset. It is a labour intensive task for an operator. Special-purpose flaw detectors are usually used in such cases, but their development and introduction have great costs as a consequence. "Special program interface" system has been designed in UD4-76 for solving this problem. It enables to use setups for the testing of various parts and, at the same time, the instrument can be used as an ordinary universal flaw detector.
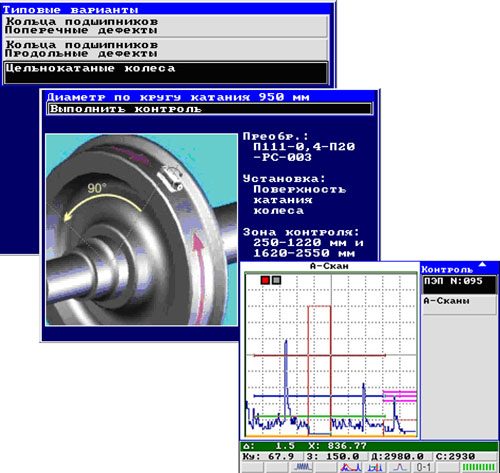
Fig. 9. Special program interface in UD4-76
Necessary template setups and program interface "Special program interface" are input in flaw detector from PC. It is impossible for an entry-level user to munge (change) the input setups, but with that, there is a possibility to make service setups out of template (basic) ones and change them. Service setups are formed in conventional memory of flaw detector. Testing sensitivity is set in "Setup" mode by echo signal from calibration reflector.
The scanning speed and acoustic coupling quality are the most important parameters of mechanized testing reliability. To track these scanning characteristics, in UD4-76 there are appropriate inspection systems which operate "Scanning speed" and "Acoustic coupling" signaling LEDs.
As it is clear from the name, the instrument is rated as universal flaw detector of IV group. So, it has not only A-Scan, but also full-fledged B-Scan with space coordinates affixment of scanning probe (Fig.10).
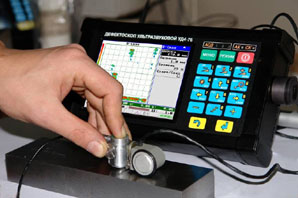
Fig. 10. B-Scan readout by UD4-76 flaw detector
Testing data can be presented in the form of B-scans – orthogonal views of the testing object – front, top and side views with marked detected flaws (Fig. 11).
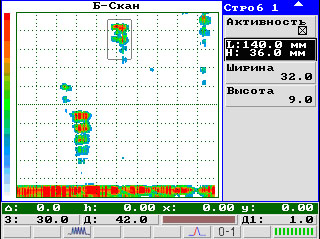
Fig. 11. B-Scan on UD4-76 flaw detector display
The usage of B-scan in UD4-76 flaw detector simplifies appreciably NDT inspector's work, and respectively, the flaw search efficiency is increased manyfold. B-scans registration allows to get an objective testing document with full information on the inspected component parts.
The measurement of detected flaws parameters by the saved B-scans (their coordinates, conditional and equivalent dimensions, amplitudes etc.) enables to determine the level of their risk (Fig. 12).
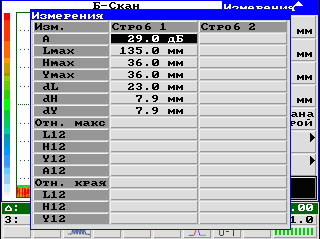
Fig. 12. Defects parameters measurement by B-Scan
The set of special scanning devices with built-in encoder have been developed for production probes supplied with UD4-76 (Fig. 13) to register the real coordinate of probe movement relative to the testing object.
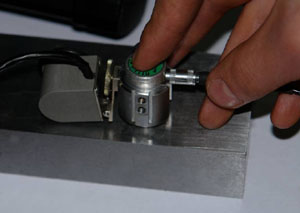
Fig. 13. Scanner for production-run probes
Flaw detector software has flexible structure and can constantly be upgraded in conformity with the needs of our Customers (Fig. 14). For instance, in the near feature we plan to equip our instrument with SAFT system – the system of coherent signals processing which enables to increase significantly the signal/noise ratio and approach the determination of actual shapes and dimensions of defects. Another algorithm, also aimed at the solving of flaw parameters measurement tasks, TOFD is based on the measurement of signals (reflected and diffracted on different defect parts) arrival time differences, and it queues to be included in the armory of the instrument software.
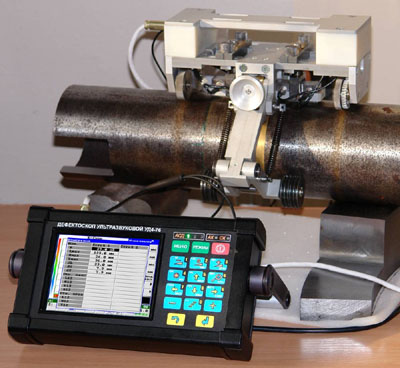
Fig. 14. Application of UD4-76 with various scanning devices


